How to Use AI Image Generator in Photoshop: Complete 2026 Guide
Last Updated: 2026-01-22 18:08:27
Adobe Photoshop has revolutionized creative workflows with its integrated AI image generation capabilities powered by Adobe Firefly. Whether you're a seasoned designer or just starting your creative journey, this comprehensive guide will walk you through everything you need to know about using Photoshop's AI image generator effectively.
Table of Contents
- Understanding Photoshop's AI Features
- Getting Started: Requirements and Setup
- Generate Image: Creating AI Images from Scratch
- Generative Fill: Editing Existing Images
- Generative Expand: Extending Your Canvas
- Advanced Techniques and Best Practices
- Choosing the Right AI Model
- Real World Applications
- Troubleshooting Common Issues
- FAQs
Understanding Photoshop's AI Features
Before diving into the how to, it's essential to understand what Photoshop offers in terms of AI powered image generation. Adobe has integrated three primary generative AI features, each serving distinct creative purposes:
The Core AI Tools
1. Generate Image Your text to image powerhouse that creates complete images from scratch using descriptive prompts. Think of it as having a full AI art generator built directly into Photoshop.
2. Generative Fill The feature that adds, removes, or modifies content within existing images while automatically matching lighting, perspective, and style. This is your go to tool for photo editing and manipulation.
3. Generative Expand Extends your image boundaries intelligently, creating seamless expansions that blend perfectly with the original content.
What Powers These Features?
Adobe Firefly Image 3 Model is the engine behind Photoshop's AI capabilities. Trained exclusively on Adobe Stock imagery, openly licensed content, and public domain materials, Firefly ensures your generated content is commercially safe a critical advantage for professional work.
Additionally, Photoshop now supports third party AI models including Google's Gemini Nano Banana Pro and Black Forest Lab's FLUX.2 Pro, giving you more options for specific use cases.
Getting Started: Requirements and Setup
System Requirements
To use Photoshop's AI image generator, you'll need:
- Photoshop Version: Latest Photoshop 2025 or Photoshop Beta
- Subscription: Adobe Creative Cloud subscription (Photography Plan or All Apps)
- Internet Connection: Required for cloud-based AI processing
- Operating System: Windows 10/11 or macOS 11+
Installation and Access
- Update Photoshop: Open Creative Cloud desktop app and ensure Photoshop is updated to the latest version
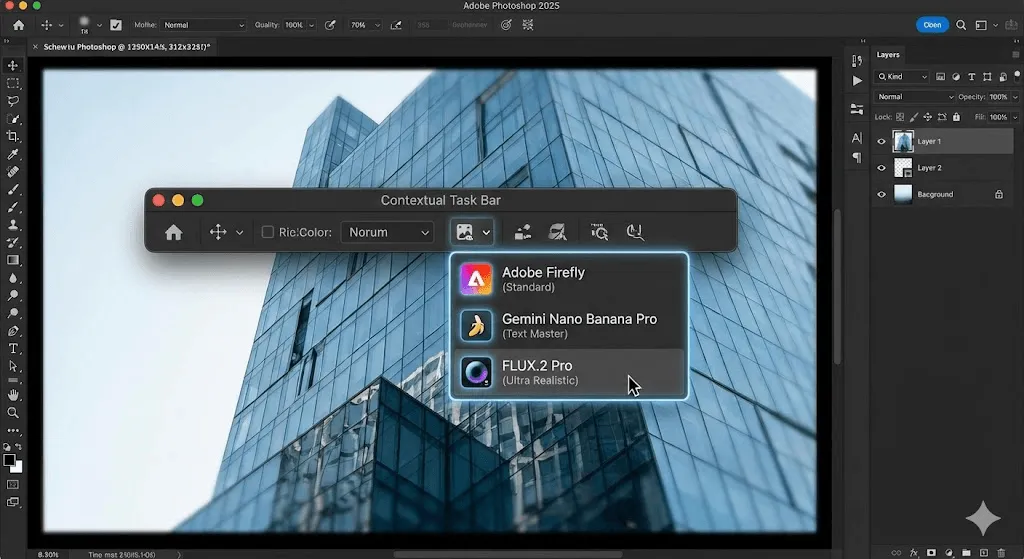
- Verify AI Features: Launch Photoshop and look for the Contextual Task Bar this is where most AI tools appear
- Check Credits: Navigate to Help > Generative Credits to view your monthly allowance
Understanding Generative Credits
Adobe uses a credit system for AI features:
- Standard features (Adobe Firefly models): 1 credit per generation
- Premium features (third party models, video generation): Multiple credits per use
- Monthly allocation: Varies by subscription plan (typically 500+ for paid plans)
- Additional credits: Available for purchase through Firefly or credit add on plans
Generate Image: Creating AI Images from Scratch
Generate Image is your gateway to creating complete images without starting from a photograph. It's perfect for conceptual work, placeholder graphics, and creative exploration.
Step by Step: Your First AI Image
Step 1: Create a New Document
Open Photoshop and create a new document:
- Go to File > New or press Ctrl+N (Windows) / Cmd+N (Mac)
- Set dimensions to 2048 x 2048 pixels (maximum supported resolution for Firefly Image 3)
- Click Create
Step 2: Access Generate Image
You'll find Generate Image in three locations:
- Contextual Task Bar (appears automatically on blank canvas)
- Edit menu > Generate Image
- Tools panel (bottom section)
Step 3: Craft Your Prompt
The prompt text box is where the magic happens. Here's how to write effective prompts:
Basic Prompt Structure:
[Subject] + [Style/Mood] + [Details] + [Technical aspects]
Example Prompts:
For Photography style images:- "A modern coffee shop interior with natural lighting, warm atmosphere, minimalist furniture, shot with 35mm lens"
- "Mountain landscape at golden hour, dramatic clouds, professional photography, high detail"
For Artistic images:
- "Abstract geometric pattern in blues and golds, art deco style, elegant composition"
- "Fantasy forest scene with glowing mushrooms, mystical atmosphere, digital painting style"
Step 4: Choose Content Type
Select between:
- Photo: Realistic, photographic results
- Art: More stylized, illustrative outputs
This choice significantly impacts the final aesthetic, so experiment with both.
Step 5: Apply Style Effects (Optional)
Click the Style button to access additional controls:
- Movements: Impressionism, Surrealism, Pop Art, etc.
- Themes: Nature, Urban, Futuristic, Vintage
- Techniques: Oil painting, Watercolor, Digital art
- Effects: Bokeh, Motion blur, Dramatic lighting
- Materials: Canvas, Metal, Glass, Wood
- Concepts: Ethereal, Gritty, Minimal, Maximalist
Step 6: Use Reference Images
One of Generate Image's most powerful features is Reference Image support:
- Click the Reference Image icon in the task bar
- Upload an image that represents your desired style
- Firefly will match the color palette, mood, and general aesthetic while creating entirely new content
This is invaluable when you need to maintain brand consistency or match a specific visual style.
Step 7: Generate and Refine
- Click Generate
- Wait 10~15 seconds for processing
- Review three variations in the Properties panel
- Click thumbnails to compare results
Not satisfied? Try these refinement strategies:
- Generate Similar: Hover over your preferred result, click the menu (three dots), and select "Generate Similar" for variations based on that specific output
- Refine Your Prompt: Add more specific details or adjust descriptive language
- Adjust Style Settings: Modify style effects or reference images
- Try Multiple Generations: Sometimes the perfect result comes on the second or third attempt
Generate Image Best Practices
Do's:
- Be specific and descriptive in prompts
- Experiment with different content types and styles
- Use reference images for consistent branding
- Generate multiple variations before deciding
- Combine generated elements with traditional Photoshop tools
Don'ts:
- Don't use vague prompts like "nice picture"
- Avoid requesting copyrighted characters or brands
- Don't expect perfection on the first try
- Avoid generic stock photo descriptions be creative
- Don't forget to save preferred generations before closing
Generative Fill: Editing Existing Images
While Generate Image creates nothing, Generative Fill transforms existing images. This is where Photoshop's AI truly shines for photo editing workflows.
Understanding Generative Fill vs Generate Image
When to use Generative Fill:
- Adding objects to existing photos
- Removing unwanted elements
- Replacing backgrounds
- Extending image elements
- Creating composite images
When to use Generate Image:
- Starting from scratch
- Creating conceptual mockups
- Generating placeholder content
- Exploring ideas without source material
Generative Fill Tutorial: Adding Objects

Scenario: Let's add a laptop to a desk workspace photo.
Step 1: Open Your Image
- Go to File > Open and select your base image
- Ensure the image is at a reasonable resolution (AI works best with good source quality)
Step 2: Select the Area
Use any Photoshop selection tool:
- Selection Brush Tool (quick, intelligent selection)
- Lasso Tool (freeform selection)
- Rectangle/Ellipse Tool (geometric shapes)
- Object Selection Tool (for precise subject isolation)
Make a selection roughly where you want the laptop to appear. The selection size helps AI understand the scale of the object you're requesting.
Step 3: Access Generative Fill
Once you've made a selection, the Contextual Task Bar appears with Generative Fill button. Click it.
Step 4: Choose Your AI Model
This is where Photoshop 2025's new capabilities shine:
- Adobe Firefly: Best for general use, commercially safe
- Gemini Nano Banana Pro: Excellent for text generation, understands instruction verbs
- FLUX.2 Pro: Superior realism, maintains image identity better
For our laptop addition, Firefly works perfectly.
Step 5: Enter Your Prompt
In the prompt field, type: "modern silver laptop on wooden desk"
Pro tip: Be specific about:
- Object appearance (modern, vintage, specific brand characteristics)
- Material and texture (silver, brushed metal, matte)
- Context and positioning (on desk, angled, open)
Step 6: Generate and Select
- Click Generate
- Review three variations in the Properties panel
- Select your preferred result
- The generated content appears on a new Generative layer (non destructive editing!)
Generative Fill Tutorial: Removing Objects
Scenario: Remove a distracting element from a photo.
The Process:
- Select the unwanted object using any selection tool
- Click Generative Fill in the Contextual Task Bar
- Leave the prompt empty
- Click Generate
That's it. Photoshop's AI will analyze the surrounding context and seamlessly remove the object, filling the space naturally.
Why it works so well: Unlike Content Aware Fill which duplicates nearby pixels, Generative Fill understands context and creates appropriate replacement content with correct lighting, texture, and perspective.
Generative Fill Tutorial: Background Replacement
Quick Method:
- Open your image with a clear subject
- Click Remove Background in the Contextual Task Bar
- After background removal, click Generate Background
- Enter your desired background description: "professional office with plants, soft lighting"
- Click Generate
The AI creates a contextually appropriate background that matches your subject's lighting and perspective.
Advanced Method for More Control:
- Use Select Subject to isolate your main subject
- Invert selection (Select > Inverse) to select the background
- Click Generative Fill
- Describe your desired background
- Generate and compare results
This method gives you more precise control over which areas change.
Mastering Selection for Better Results
The quality of your Generative Fill results directly correlates with selection quality. Here are professional selection strategies:
For Adding Objects:
- Make selections slightly larger than needed
- Use feathering (5 10 pixels) for natural blending
- Consider the object's realistic scale in the scene
For Removing Objects:
- Select just beyond the object's edges
- Include any shadows or reflections
- Use polygon lasso for complex shapes
For Background Changes:
- Use quick selection for subjects with clear edges
- Refine Edge/Select and Mask for hair and fine details
- Consider color range selection for uniform backgrounds
Generative Expand: Extending Your Canvas
Ever needed to change an image's aspect ratio or add more space around your composition? Generative Expand solves this elegantly.
When to Use Generative Expand
Perfect scenarios:
- Converting portrait photos to landscape orientation
- Adding breathing room around compositions
- Fixing poorly framed shots
- Creating different aspect ratios for various platforms
- Expanding backgrounds seamlessly
Step by Step: Expanding an Image
Step 1: Open Your Image
Start with any image that needs expansion.
Step 2: Select the Crop Tool
Press C or select the Crop Tool from the toolbar.
Step 3: Extend the Canvas
Drag the crop boundaries outward to create additional space around your image. You'll see checkerboard (transparency) where the new area will be generated.
Step 4: Enable Generative Expand
In the options bar at the top, ensure Generative Expand is selected from the "Fill" dropdown.
Step 5: Add Instructions (Optional)
Click Generative Fill in the Contextual Task Bar to add a prompt if you want to guide what fills the expanded area:
- Leave empty for automatic extension matching the existing image
- Add a prompt to introduce new elements: "add more trees and mountains"
Step 6: Generate
Click Generate in the Contextual Task Bar or simply press Enter when using the Crop Tool. Photoshop creates a seamless expansion that matches the original image's style, lighting, and content.
Generative Expand Best Practices
Expansion Strategies:
- Moderate expansion: Works best with extensions up to 50% of original dimensions
- Multiple passes: For dramatic expansions, work in stages rather than one massive extension
- Directional expansion: Expand one direction at a time for more control
Content Considerations:
- Simple backgrounds (sky, walls, textures) expand more reliably
- Complex scenes may require multiple generations to find the best match
- Architectural elements benefit from symmetrical expansion
- Natural scenes (landscapes, water) typically expand seamlessly
Common Use Cases:
- Social Media Formatting: Convert vertical images to horizontal for different platforms
- Print Preparation: Add bleed areas for professional printing
- Composition Improvement: Give subjects more breathing room
- Video Frame Conversion: Adjust still images for video aspect ratios
Advanced Techniques and Best Practices
Writing Better Prompts
Prompt engineering significantly impacts your AI generation quality. Here's a framework for crafting effective prompts:
The Anatomy of a Great Prompt:
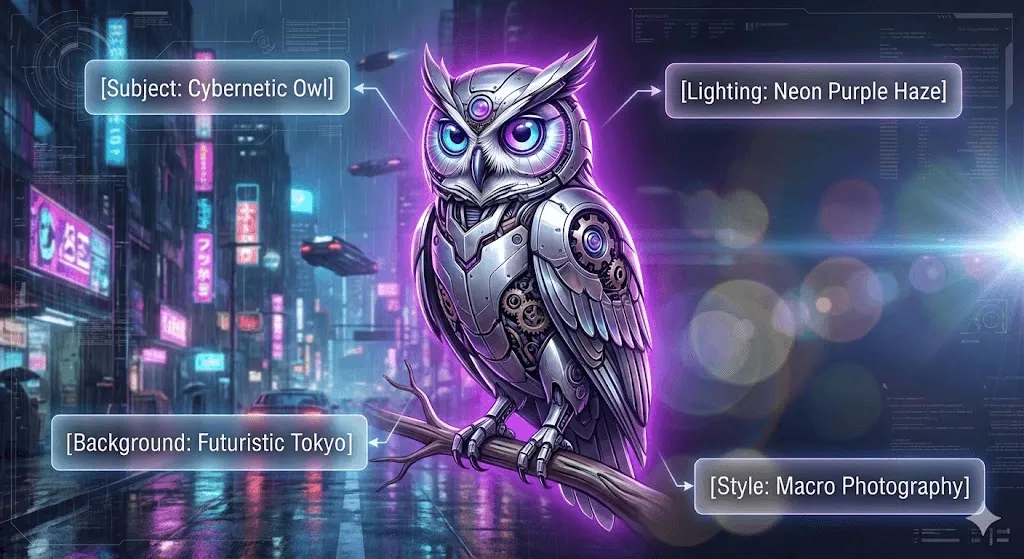
[Main Subject] in [Environment/Setting], [Lighting], [Style], [Mood], [Technical Details]
Example Breakdown:
Generic prompt: "a dog"
Professional prompt: "golden retriever puppy sitting in a modern minimalist living room, soft natural window light from the left, professional photography style, warm and inviting atmosphere, shallow depth of field, 50mm lens"
Specific Prompt Tips by Category:
For Portraits:- Specify age, expression, and emotion
- Describe lighting direction and quality
- Include wardrobe and styling details
- Mention camera angles and framing
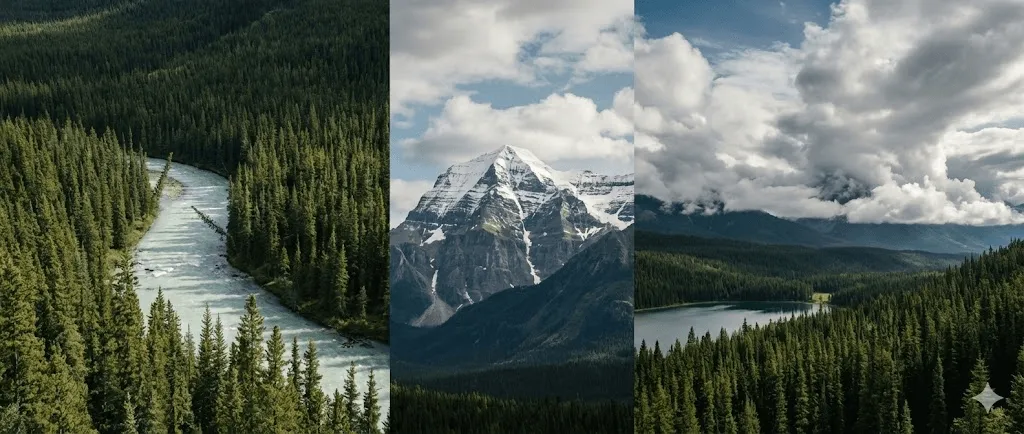
For Landscapes:
- Define time of day and weather conditions
- Describe terrain and vegetation
- Include atmospheric elements (fog, clouds, haze)
- Specify color palette or season
For Product Photography:
- Detail material and texture
- Describe surface and reflections
- Specify background and context
- Include lighting setup description
For Abstract/Artistic:
- Name specific art movements or styles
- Describe color schemes and palette
- Include composition elements
- Reference texture and medium
Combining AI with Traditional Photoshop Tools
The real power emerges when you blend AI generation with conventional Photoshop techniques:
Workflow Example: Professional Product Composite
- Generate base scene with Generate Image: "modern white studio backdrop with soft shadows"
- Add your product photo (real photograph)
- Use Generative Fill to create realistic shadows under the product
- Blend with adjustment layers for color harmony
- Apply traditional retouching (dodge, burn, sharpening)
- Add text and branding with Type tools
Workflow Example: Creative Portrait Enhancement
- Start with portrait photograph
- Use Generative Expand to change aspect ratio and add artistic background
- Apply Generative Fill to enhance or modify background elements
- Use traditional selection and masking to refine edges
- Apply adjustment layers for color grading
- Add finishing touches with brushes and filters
Non Destructive Workflow Best Practices
AI features in Photoshop automatically create new layers, but you should adopt these habits:
Layer Organization:
- Name generative layers descriptively ("AI_background", "AI_added_tree")
- Group related generative elements
- Use layer comps to save variations
- Maintain original image on bottom layer
Version Management:
- Save iterations before major changes
- Use File > Save As for significant variations
- Keep source files separate from working files
- Export web versions from master files
Editability:
- Generative layers can be regenerated
- Keep selection masks as separate alpha channels
- Document prompt text in layer names or notes
- Save PSD files to preserve all edit capabilities
Choosing the Right AI Model
Photoshop 2025's multi model support means you need to understand when to use each AI engine.
Adobe Firefly (Standard)
Strengths:
- Commercially safe, trained on licensed content
- Best integration with Photoshop workflow
- Consistent with Adobe's aesthetic
- Included in standard credit allocation
- Excellent general purpose performance
Best for:
- Professional commercial work
- Brand safe content generation
- General photo editing
- Most common use cases
- When copyright is a concern
Limitations:
- Can struggle with very specific text generation
- Instruction verbs may not work optimally
- Less realistic than some alternatives in specific scenarios
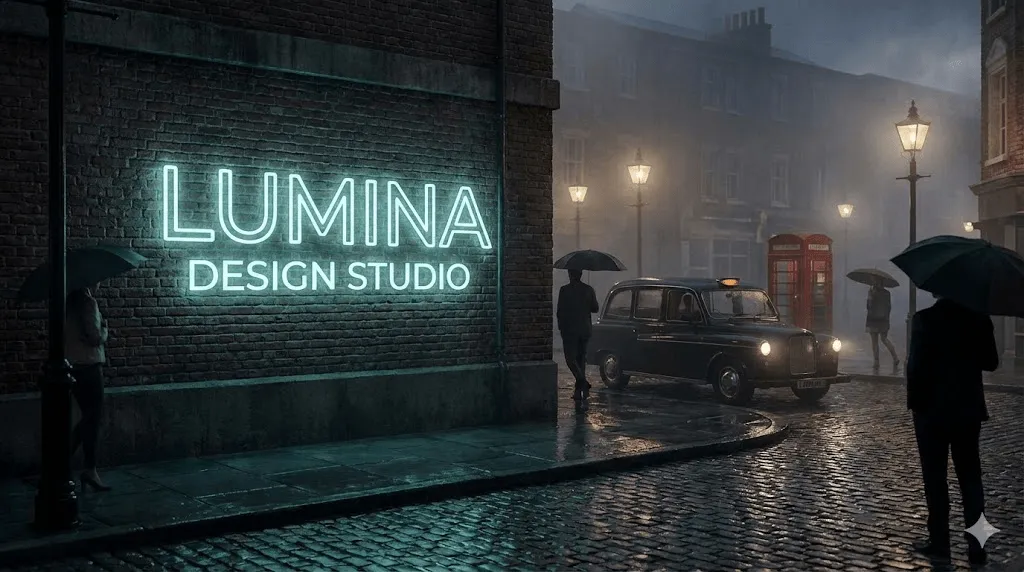
Google Gemini Nano Banana Pro (Premium)
Strengths:
- Superior text generation in images
- Understands instruction based prompts better
- Excellent at following complex directions
- Better interpretation of layered instructions
Best for:
- Generating images with readable text
- Signage, storefronts, book covers
- Following multi step instructions
- Complex prompt interpretation
- Technical illustrations with labels
Limitations:
- Premium feature (higher credit cost)
- May have different aesthetic than Firefly
- Not as seamlessly integrated yet
Example Use Case: If you're creating a storefront image and need the shop sign to say "CAFÉ" legibly, Gemini will likely produce more readable text than Firefly.
FLUX.2 Pro (Premium)
Strengths:
- Outstanding photorealism
- Better at maintaining image "identity"
- Understands instruction verbs naturally
- Excels at realistic lighting and physics
- Superior for detailed realism
Best for:
- Photorealistic rendering needs
- When realism is paramount
- Complex lighting scenarios
- Maintaining consistency across generations
- Professional photography style outputs
Limitations:
- Premium feature (higher credit cost)
- May take longer to process
- Might be overkill for simple tasks
Example Use Case: When extending a professional product photograph where lighting accuracy is critical, FLUX.2 maintains physical accuracy better than alternatives.
Decision Framework
Use Adobe Firefly when:
- You need commercial safety
- Working on client projects
- Budget conscious (standard credits)
- General editing needs
- Learning and experimenting
Use Gemini Nano Banana Pro when:
- Text must be legible in the image
- Complex instruction based prompts
- Technical documentation needs
- Specific text placement required
Use FLUX.2 Pro when:
- Photorealism is non negotiable
- Professional photography projects
- Maintaining lighting accuracy
- High end commercial requirements
- Working with premium production values
Switching Between Models
To change AI models in Generative Fill:
- Make your selection
- Click Generative Fill in Contextual Task Bar
- Click the model picker dropdown (next to prompt field)
- Select your preferred AI model
- Enter prompt and generate
Remember: Model choice affects credit consumption. Monitor your monthly allocation in Help > Generative Credits.
Real World Applications
Understanding theory is valuable, but seeing practical applications helps cement your learning.
E commerce Product Photography
Challenge: Client needs lifestyle images but only has studio product shots.
Solution:
- Start with clean product photo on white background
- Use Select Subject to isolate product
- Invert selection and use Generative Fill
- Prompt: "modern kitchen countertop with marble texture, natural morning light, minimalist styling"
- Generate until you find the perfect lifestyle context
- Use traditional retouching for shadows and color matching
- Export for e commerce platform
Result: Professional lifestyle imagery without expensive photoshoots.
Social Media Content Creation
Challenge: Need consistent visual branding across multiple platform formats.
Solution:
- Create master image at 2048x2048 using Generate Image
- Prompt: "abstract gradient background in brand colors blue and purple, modern and clean, professional"
- For Instagram Story (1080x1920): Use Generative Expand vertically
- For Facebook Post (1200x630): Use Generative Expand horizontally
- For Twitter Header (1500x500): Use Crop and Generative Expand
- Overlay text and logos consistently
Result: Cohesive multi platform presence from single AI generated asset.
Real Estate Virtual Staging
Challenge: Empty property photos need furnishing visualization.
Solution:
- Open empty room photograph
- Use Selection Brush to select floor areas
- Generative Fill with prompt: "modern area rug, neutral tones"
- Select wall areas and add: "contemporary wall art"
- Add furniture with multiple Generative Fill operations: "gray sectional sofa", "glass coffee table"
- Fine tune with adjustment layers and traditional tools
Result: Professional virtual staging at fraction of traditional costs.
Digital Art and Illustration
Challenge: Concept artist needs rapid ideation for game environment.
Solution:
- Generate Image base concepts: "fantasy castle on floating island, dramatic clouds, golden hour lighting, concept art style"
- Generate 10~15 variations to explore directions
- Select best 2~3 and use Generate Similar for refinement
- Use Generative Expand to develop chosen concept into full scene
- Use Generative Fill to add specific elements: characters, props, details
- Traditional painting techniques for final polish
Result: Rapid concept development from idea to refined illustration.
Photography Repair and Enhancement
Challenge: Historic family photo needs restoration and completion.
Solution:
- Scan and import damaged photograph
- Use Generative Fill with empty prompts to repair torn or faded areas
- Generative Expand to recreate missing edges
- Traditional restoration tools (Clone Stamp, Healing Brush) for fine details
- Apply period appropriate colorization if desired
- Print quality export
Result: Restored photograph preserving memories and family history.
Troubleshooting Common Issues
Even with powerful AI, you'll encounter challenges. Here's how to solve common problems.
"Generation Failed" or Error Messages
Possible Causes and Solutions:
- Credit ExhaustionCheck: Help > Generative CreditsSolution: Wait for monthly reset or purchase credit add onPrevention: Monitor credit usage, use standard features when possible
- Internet ConnectivityCheck: AI features require stable internet connectionSolution: Verify connection, try againPrevention: Work on stable networks, avoid public WiFi for critical work
- Prompt Policy ViolationCause: Request violated Adobe's content policySolution: Revise prompt to remove potentially restricted contentPrevention: Avoid requesting copyrighted characters, explicit content, or public figures
- File Size or ComplexityCause: Source image too large or complex for processingSolution: Resize image or simplify selectionPrevention: Work at reasonable resolutions (under 8000px dimensions)
Poor Quality or Unexpected Results
Issue: Generated content doesn't match expectations
Solutions:
- Refine Your PromptAdd more specific descriptive detailsInclude technical photography termsSpecify style, mood, and atmosphereReference specific artistic movements or techniques
- Adjust Selection SizeFor adding objects: Match selection size to intended scaleFor removing objects: Extend selection to include contextual areaUse feathering for better blending (5~20 pixels depending on resolution)
- Try Different AI ModelsIf Firefly isn't delivering, try FLUX.2 for realismUse Gemini for text heavy generationsExperiment with multiple models for comparison
- Generate Multiple TimesAI is probabilistic; results vary each generationGenerate 3~5 times before considering failureUse "Generate Similar" on promising results
- Break Complex Requests into StepsInstead of "add three people and a dog in park", work incrementallyAdd elements one at a time for better controlCombine multiple generative layers
Blending and Integration Issues
Issue: Generated content looks obviously artificial or doesn't match the image
Solutions:
- Manual BlendingLower opacity of generative layerUse layer masks to blend edges manuallyPaint with soft brushes at reduced opacity
- Color and Tone MatchingApply adjustment layers (Curves, Color Balance)Use Color Lookup tables (LUTs) for unified color gradingMatch white balance between generated and original content
- Add Realistic DetailsUse Dodge/Burn for lighting consistencyAdd grain or texture to match photo qualityApply subtle blur to match depth of field
- Shadow and ReflectionGenerated objects may lack proper shadowsUse traditional layer styles or manual paintingCreate reflection layers for realistic integration
Text Legibility Problems
Issue: Generated text is illegible or garbled
Solutions:
- Switch to Gemini Nano Banana ProSpecifically designed for better text generationWorth the premium credit cost for text critical work
- Use Reference ImagesProvide examples of legible text in desired styleReference image guides text rendering
- Add Text ManuallyGenerate scene without textUse Photoshop Type tools for crisp, perfect textStyle text with layer effects to match scene
- Post Process TextSharpen text areas selectivelyManually enhance edges if neededConsider regenerating just text areas
Frequently Asked Questions
Is AI generated content in Photoshop safe for commercial use?
Yes, when using Adobe Firefly models. Firefly is trained exclusively on Adobe Stock images, openly licensed content, and public domain material, making it commercially safe. Content Credentials are automatically embedded to maintain transparency.
However, if using third party models (Gemini, FLUX.2), review their specific licensing terms. Adobe cannot guarantee commercial safety for non Firefly generations.
How many times can I use AI features per month?
This depends on your subscription plan:
- Free plans: Limited trial generations
- Photography Plan: 500+ standard generations monthly
- Creative Cloud All Apps: 1000+ standard generations monthly
- Premium features consume more credits (typically 3~5 credits per generation)
Check your current allocation at Help > Generative Credits.
Can I use AI features offline?
No. AI generation requires cloud processing on Adobe's servers. You must maintain an internet connection to use Generate Image, Generative Fill, or Generative Expand.
What's the maximum resolution for AI generated images?
Generate Image with Firefly Image 3 Model supports up to 2048 x 2048 pixels. However, you can upscale using Photoshop's traditional Super Resolution feature (Filter > Neural Filters > Super Zoom) or Generate Similar for higher quality.
For Generative Fill and Generative Expand, there's no strict limit as you're working with existing images, though very large files may process more slowly.
Will AI replace traditional Photoshop skills?
No. AI features are tools that enhance rather than replace creativity and technical skill. Professional results still require:
- Understanding of composition and design principles
- Knowledge of color theory and lighting
- Mastery of selection and masking techniques
- Traditional retouching skills
- Artistic vision and decision making
Think of AI as a powerful assistant that accelerates workflows and enables possibilities, not as a replacement for craft and expertise.
Can I edit or regenerate after accepting results?
Yes! Generative layers are non destructive:
- Click the generative layer
- Open Properties panel
- Click "Generate more variations"
- Or modify the prompt and regenerate
This flexibility allows iterative refinement without damaging original content.
Why do my results look different from examples I've seen?
AI generation is probabilistic, meaning results vary between generations. Factors affecting output:
- Specific prompt wording
- AI model version (Firefly updates regularly)
- Random seed in generation process
- Source image quality and composition
- Selection size and feathering
Generate multiple times and use "Generate Similar" to explore variations around promising results.
Are there content restrictions?
Yes. Adobe's generative AI policies prohibit:
- Copyrighted characters or branded content
- Explicit or inappropriate content
- Public figures without appropriate context
- Hate speech or discriminatory content
- Misleading or harmful imagery
Violating these policies results in generation failure and may affect account status.
How does Photoshop's AI compare to Midjourney or DALL E?
Photoshop's advantages:
- Integrated into professional editing workflow
- Non-destructive, layer based editing
- Commercially safe content with Firefly
- Precise control with selections and masks
- Traditional tools for refinement
Standalone AI advantages:
- Often higher initial quality
- More artistic style options
- Larger community and prompt libraries
- Specialized for pure generation
The best choice depends on your workflow. Photoshop excels when AI is one component of a larger editing process.
Can I use my own images to train the AI?
Not currently in Photoshop's standard AI features. However, Adobe has announced custom model training capabilities coming to Firefly, allowing creators to train AI on their own visual style. This feature is in development for enterprise customers first.
What happens to my generated images?
Images generated with AI in Photoshop:
- Belong to you (you retain rights)
- Are marked with Content Credentials (metadata indicating AI generation)
- Are not used to train Adobe's AI models without explicit permission
- Can be used commercially (when using Firefly)
Adobe's privacy policy details full data handling practices.
Conclusion: Mastering AI Powered Creativity
Adobe Photoshop's AI image generator represents a paradigm shift in creative workflows. By understanding the distinctions between Generate Image, Generative Fill, and Generative Expand, you've equipped yourself with powerful tools that can dramatically accelerate your creative process.
Key Takeaways
Remember these core principles:
- Choose the right tool: Generate Image for creation, Generative Fill for editing, Generative Expand for extension
- Write better prompts: Specific, descriptive language yields better results
- Select the appropriate AI model: Firefly for general use, Gemini for text, FLUX.2 for realism
- Embrace iteration: AI is probabilistic; generate multiple times
- Blend with traditional skills: AI enhances but doesn't replace craftsmanship
Your Next Steps
To continue your learning journey:
- Practice regularly: Dedicate time each week to experiment with AI features
- Study great prompts: Analyze effective prompts in the Firefly Community Gallery
- Join communities: Engage with other creators learning AI workflows
- Stay updated: Adobe releases frequent updates; follow official channels
- Develop your style: Use AI as a tool to enhance your unique creative voice
The Future of AI in Photoshop
Adobe continues rapidly evolving its AI capabilities. Expect:
- Custom model training with your visual style
- Enhanced AI understanding and control
- Faster processing and higher resolutions
- More sophisticated multi modal integration
- Advanced video AI capabilities
The creative landscape is transforming, and those who master these tools early will lead the next generation of visual storytelling.
Additional Resources
Official Adobe Resources:
- Adobe Firefly Web App Practice and explore
- Adobe Help Center Detailed documentation
- Adobe Blog Latest feature announcements
- Firefly Community Gallery Inspiration and prompts
Community Resources:
- Creative Cloud Community Forums
- Adobe YouTube Channel Official tutorials
- LinkedIn Learning Structured courses
- Behance Professional showcase and inspiration
Keep Exploring: The most important step is to start creating. Open Photoshop, experiment with prompts, try different techniques, and most importantly have fun exploring the possibilities. The intersection of human creativity and artificial intelligence is just beginning, and you're now equipped to be part of this exciting evolution.
Happy creating!
Did this guide help you master Photoshop's AI image generator? Share your creations and experiences with the creative community. Tag your work with #PhotoshopAI to inspire others on their journey.
This guide is regularly updated to reflect the latest features and best practices. Last updated: December 2025.