How to Use Canva AI Image Generator: Complete Guide (2026)
Last Updated: 2026-01-22 18:08:26
Most Canva users know the AI Image Generator exists but very few know how to actually use it well.
If you’ve ever typed a simple prompt, hit “Generate,” and ended up with something generic, unusable, or clearly AI looking, you’re not doing anything wrong. Canva’s AI tools are powerful, but they’re extremely sensitive to how you prompt them, which tool you choose, and when you stop regenerating and start editing.
This guide is a practical, no fluff walkthrough of how the Canva AI Image Generator really works in 2026. You’ll learn which AI tools inside Canva are worth using, how to write prompts that produce usable images (not just pretty ones), how to avoid wasting generation credits, and how to turn AI outputs into real design assets.
Whether you’re creating social media posts, blog headers, marketing graphics, or presentation visuals, this guide will help you get better results faster without relying on guesswork.
What You're Actually Working With
Canva has three main AI image tools built into their platform, and they're not interchangeable. Here's what each one does:
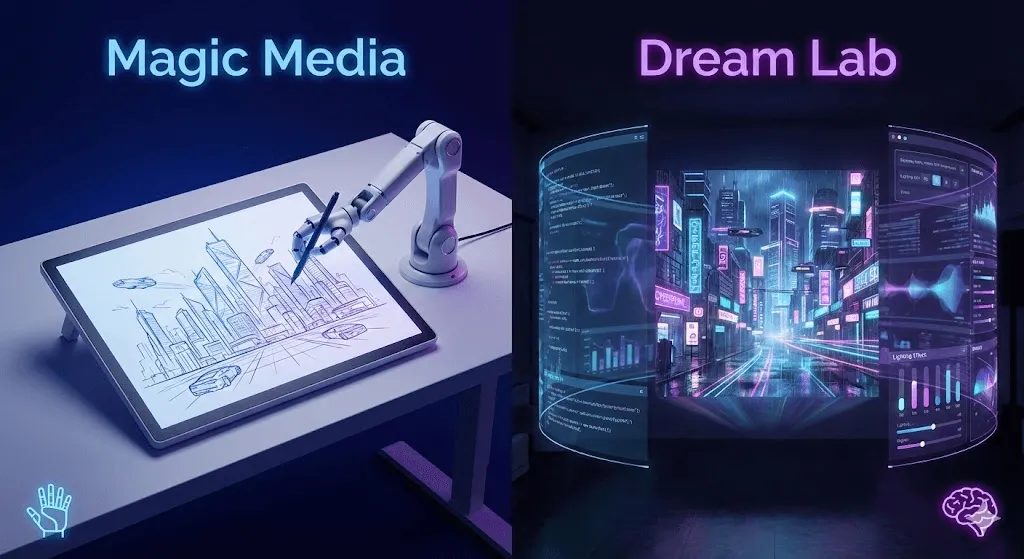
Magic Media is the workhorse. It's Canva's native tool powered by Stable Diffusion, and it's what you'll use 80% of the time. The interface is simple: type what you want, pick a style, and hit generate. It handles everything from photorealistic images to illustrations, and because it's built directly into Canva, you can drop generated images straight into your designs.
Dream Lab is newer and feels more polished. The big difference? It rewrites your prompts for you. Type "sunset beach," and it might expand that to "golden hour sunset over tropical beach with palm trees, warm orange and pink tones, tranquil atmosphere." Sometimes this helps, sometimes it goes rogue. Dream Lab also lets you upload reference images to guide the style, which is genuinely useful when you need brand consistency.
DALL·E and Imagen are third party options available through Canva's Apps section. They're separate AI models with their own strengths, but using them means extra clicks and potentially different usage limits. I rarely bother unless Magic Media isn't cooperating.
The main reason to use Canva's AI tools instead of standalone generators? You skip the download upload dance. Generate an image, tweak it, add text, adjust colors everything happens in one place.
How to Actually Access These Tools
Getting to Magic Media (The Main Tool)
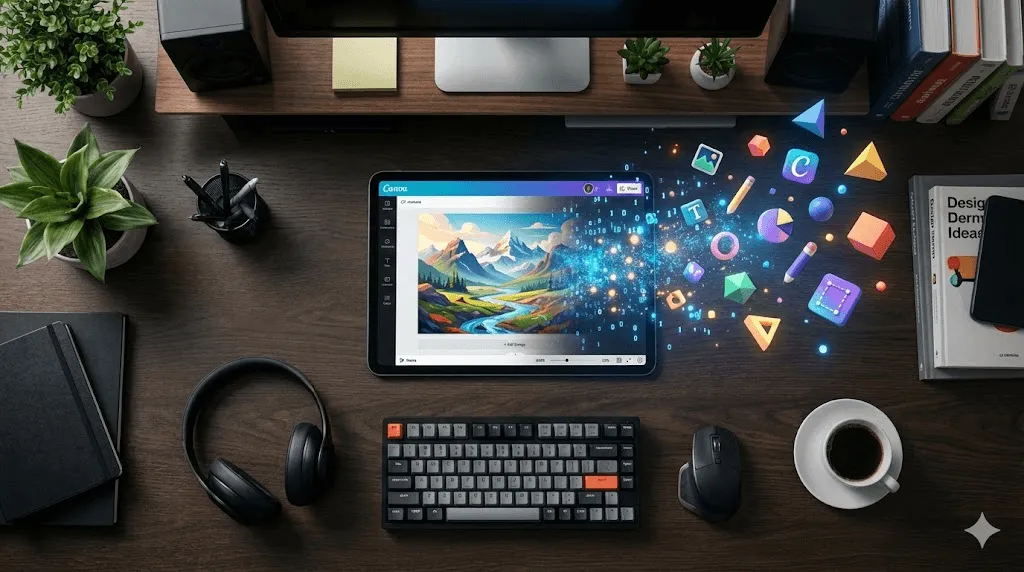
Start in any Canva design a blank canvas, an Instagram post template, whatever. Look at the left sidebar and click Elements. Scroll past all the graphics and templates until you see AI Image Generator. Click Generate your own.
You'll get a panel with three tabs at the top: Images, Graphics, and Videos. For this guide, we're focused on images. Graphics are more icon style outputs, and Videos are still pretty experimental (4 second loops that sometimes work).
Accessing Dream Lab
This one starts from the Canva homepage, not inside a design. Click the search bar, and you'll see Create an image as an option. Click it.
Dream Lab gives you more upfront control over style and dimensions. You'll see preset styles like Cinematic, Illustration, and Bokeh. Pick one before you generate. The aspect ratio options (1:1, 16:9, 9:16) are useful if you know where the image is going.
When to Use Each Tool
Start with Magic Media. It's faster, simpler, and handles 90% of what you need. Switch to Dream Lab when:
- You need a specific aspect ratio from the start
- You want to upload a reference image for style matching
- Magic Media's output feels too generic
I keep both open in different tabs when I'm doing bulk image generation. Different prompts perform better in different tools, and you never know which one will nail it until you try.
Writing Prompts That Actually Work
Here's the thing about AI image generators: they're literal. Tell them "cat," and you'll get... a cat. But you won't get the cat you imagined. You need to guide the AI with specific details.
The Five Part Formula
After burning through probably 200 generation credits, I've settled on this structure:
[Style] + [Subject] + [Action/State] + [Setting] + [Mood/Quality]
Let's break that down with a real example.
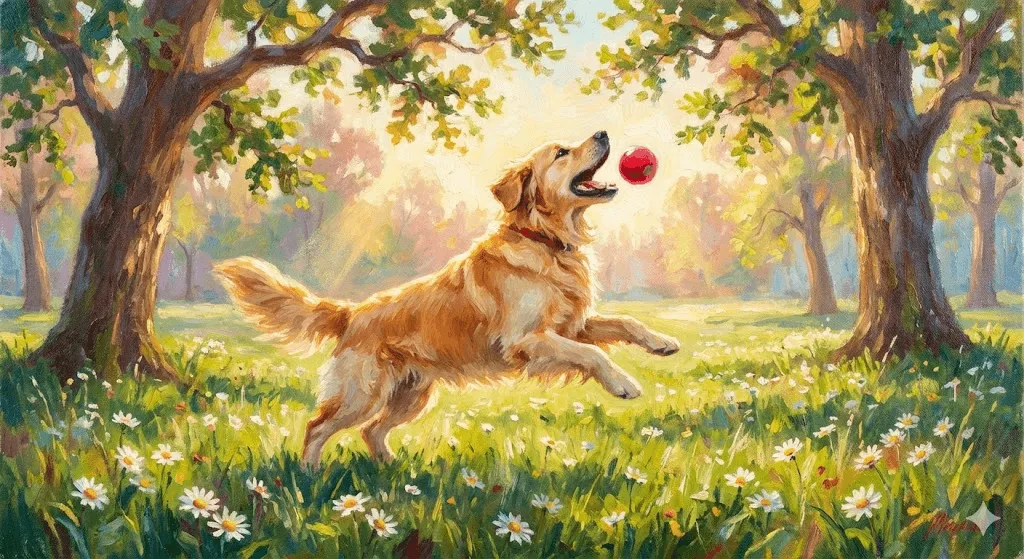
Bad prompt: "Dog in park"
Better prompt: "Watercolor illustration of golden retriever playing with ball, sunny park with green grass, happy and energetic"
That second version hits all five parts:
- Style: Watercolor illustration
- Subject: Golden retriever
- Action: Playing with ball
- Setting: Sunny park with green grass
- Mood: Happy and energetic
The AI now knows exactly what aesthetic you want, what should be in the image, what's happening, where it takes place, and what feeling it should convey.
Real Before and After Examples
I'll show you the actual progression of prompts I used when creating a header image for a blog post:
Attempt 1: "Coffee shop" Result: Generic Starbucks looking interior. Useless.
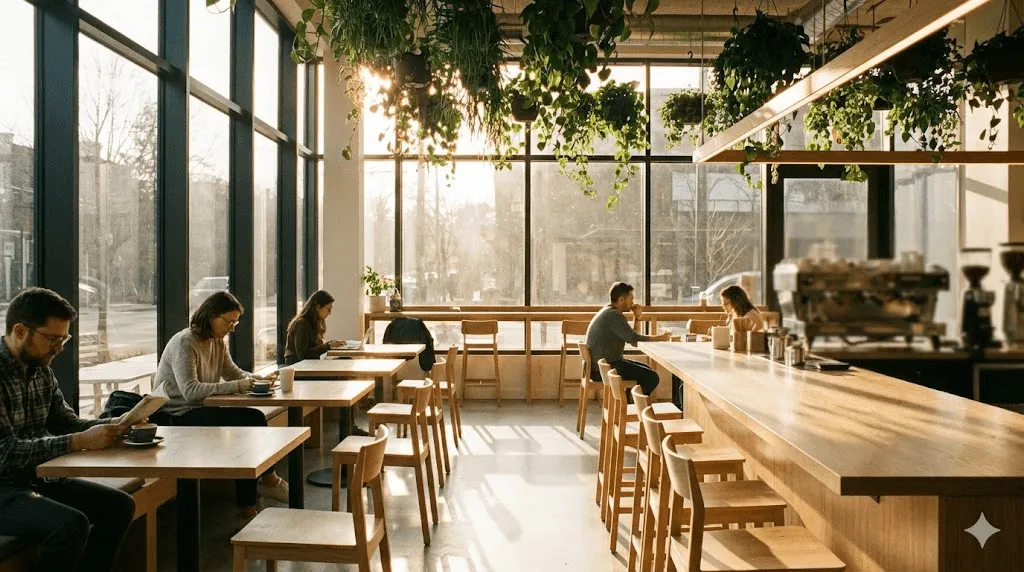
Attempt 2: "Modern coffee shop interior" Result: Better, but still stock photo vibes. Nothing special.
Attempt 3: "Modern coffee shop interior with large windows, natural light, plants hanging from ceiling, warm wood tones" Result: Now we're talking. This had character.
Final attempt: "Cozy modern coffee shop interior, wide angle view, morning sunlight streaming through floor to ceiling windows, hanging plants, light wood furniture, warm and inviting atmosphere" Result: Exactly what I needed. Took it, dropped it into the design, shipped it.
The difference between attempt 1 and the final version? Specificity. Not more words more useful details.
Style Specific Prompt Techniques
For realistic photos, think like a photographer:
- "Eye level shot" or "bird's eye view" (camera angle)
- "Shallow depth of field" or "everything in focus" (depth)
- "Golden hour lighting" or "overcast day" (lighting)
- "50mm lens perspective" (optional, but helps)
For illustrations, think like an art director:
- "Flat design" vs "hand drawn" vs "watercolor" (medium)
- "Bold outlines" vs "no outlines" (line work)
- "Vibrant colors" vs "muted earth tones" (palette)
For abstract stuff, focus on feeling:
- "Energetic and dynamic" vs "calm and peaceful" (mood)
- "Flowing organic shapes" vs "geometric patterns" (form)
- Color is critical here name your palette
What Doesn't Work
I've learned these the hard way:
Don't use vague descriptors. "Beautiful sunset" doesn't tell the AI anything. Every sunset is beautiful. Is it purple? Orange? Cloudy? Clear? Over ocean or mountains?
Don't contradict yourself. "Bright dimly lit room" confuses the model. Pick one.
Don't mention brands or specific people unless you have rights. Canva's filters will block it anyway, and you're wasting a generation.
Don't write a novel. After about 30~40 words, you're just adding noise. The AI loses focus. Keep it tight.
Choosing Styles and Customizing Output
Magic Media's Style Options
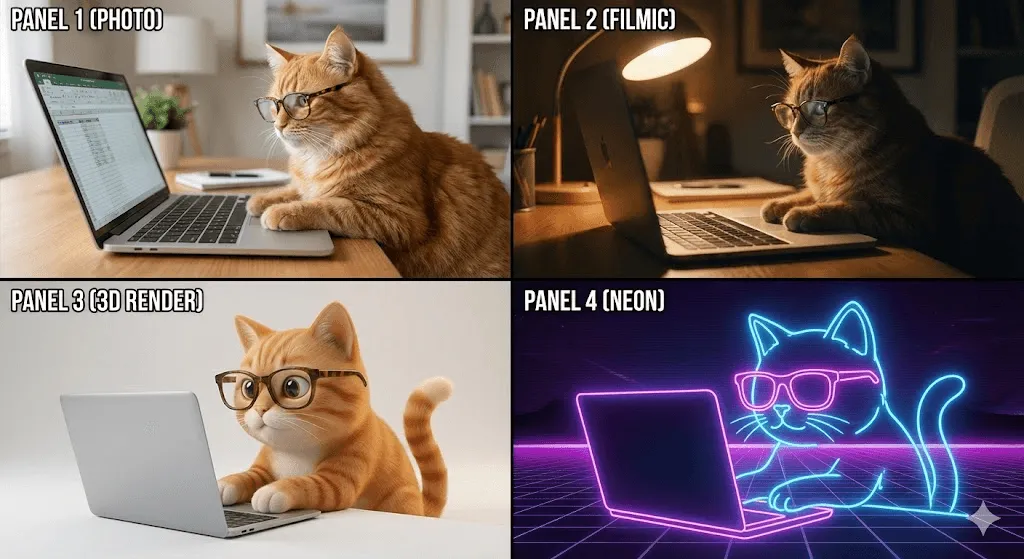
When you're in Magic Media, you'll see a "Style" dropdown. Here's what each actually produces:
Photo: Realistic, looks like someone took a picture. Use for product mockups, realistic scenes, anything that should look "real."
Filmic: Like Photo but more dramatic. Richer colors, more contrast, cinematic feel. I use this for hero images that need impact.
Illustration: Catches a bunch of different illustration styles. More cartoony than Photo, less realistic. Good for blog graphics and social posts where realism isn't the goal.
Watercolor: Exactly what it sounds like. Soft edges, painted look. Hit or miss depending on subject matter.
3D Render: Computer generated look. Clean, modern, sometimes a bit sterile. Works well for tech products.
Neon: Bold, glowing, electric. Very specific use case, but great when that's the vibe.
Here's what I've noticed: the same prompt in different styles can produce wildly different results. When I'm generating images for a project, I'll run the same prompt through 2~3 styles and pick the best output. It takes more credits but saves time versus trying to perfect one style.
Using Reference Images in Dream Lab
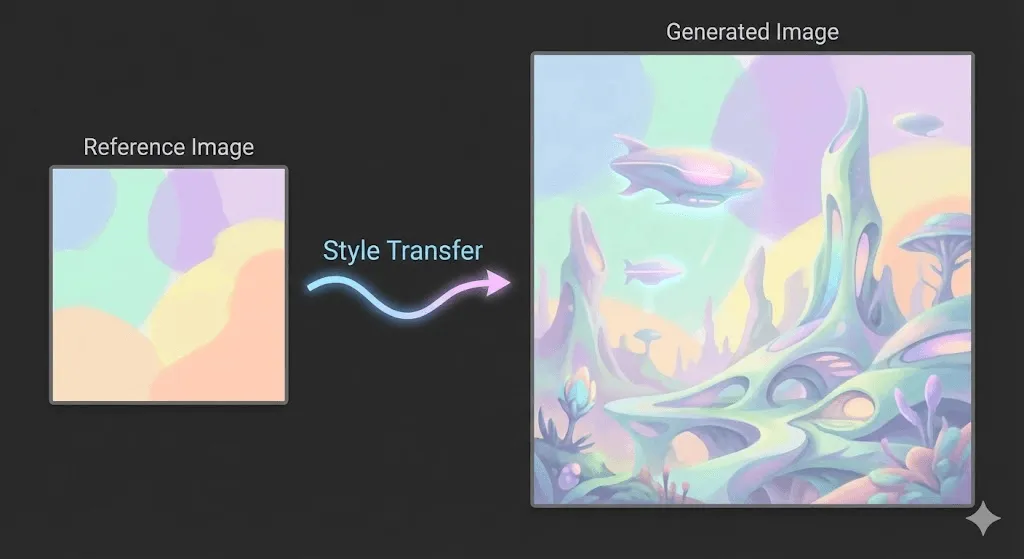
This is Dream Lab's killer feature. You can upload an image as a style reference, and the AI will generate new images that match the aesthetic.
Here's when it's genuinely useful:
Brand consistency: Upload one branded image, generate variations that maintain the same visual style. I did this for a client's social media one reference photo kept all 20 generated images on brand.
Matching existing content: Need a new image that fits with your established visual style? Reference image handles it better than trying to describe the style in words.
Style exploration: Upload an illustration you like, generate variations. Faster than describing "sort of hand drawn but digital with that slightly textured look."
The process: In Dream Lab, look for the + icon in the description box. Click it, upload your reference image, then write your text prompt as normal. The AI considers both.
Aspect Ratios That Matter
Before you generate, pick your dimensions:
1:1 (Square): Instagram feed posts, profile pictures, most social thumbnails 16:9 (Landscape): YouTube thumbnails, presentation slides, website headers 9:16 (Portrait): Instagram Stories, TikTok, Reels, any vertical content 4:5: Instagram feed (portrait orientation), performs better on mobile
Generate at the right size from the start. Cropping a landscape image to portrait later means losing the composition you wanted.
Advanced Techniques I Actually Use
Iterative Refinement (How I Get Good Results)
Nobody nails it on the first try. Here's my current workflow:
Round 1: Basic prompt, see what happens "Coffee on desk with laptop"
Round 2: Add style and setting based on what was missing "Lifestyle photography of coffee mug on wooden desk with laptop, morning light"
Round 3: Refine based on Round 2 output "Lifestyle photography of ceramic coffee mug on minimalist wooden desk with silver laptop, warm morning sunlight from window, shallow depth of field"
Round 4: Final tweaks "Lifestyle photography of white ceramic coffee mug with steam on minimalist oak desk with silver MacBook, warm golden morning sunlight streaming from left side, shallow depth of field, cozy home office"
Each round, I change ONE thing. Add more setting details. Specify lighting. Adjust the style. Trying to fix everything at once doesn't work you can't tell what actually improved the output.
This process takes maybe 5 minutes and uses 15~20 credits total. It's faster than searching stock photo sites for 30 minutes and hoping something fits.
Generating Series with Visual Consistency
This is tricky. AI generators aren't great at producing multiple images that look like they belong together. But here's what works:
Technique 1: Lock your base prompt
Create a template that includes all style information: "Flat design illustration, pastel color palette, rounded corners, minimal shadows, simple shapes"
Then add only the subject detail that changes:
- "...of coffee cup"
- "...of laptop"
- "...of notebook"
Keep everything before the subject identical across all prompts.
Technique 2: Use Dream Lab reference images
Generate one good image. Then use it as a reference for all subsequent generations. The style consistency improves dramatically.
Technique 3: Be extremely specific about style
Generic: "illustration style" Specific: "flat design vector illustration, 4 color palette (navy blue, coral pink, cream, sage green), geometric shapes, no gradients, thick outlines"
The more precisely you define the style, the more consistent your series becomes.
Combining with Canva's Editing Tools
Generated images are starting points. I almost never use them raw:
Background Remover (Pro feature): Pull the subject out, place it on a different background. Essential for product style images.
Magic Edit (Pro feature): Change specific parts. Generated a dog but need it to be brown instead of black? Magic Edit handles it without regenerating.
Filters: Canva's photo filters help blend AI images with the rest of your design. Generated images sometimes look "too clean" a subtle filter fixes that.
Cropping and composition: AI doesn't always nail composition. Crop aggressively. Sometimes the best image is hiding in a corner of what was generated.
Text overlays: This is why you're in Canva. Generate the image, add your headline, adjust colors, export. Five minutes start to finish.
Troubleshooting Common Problems
Problem: My images look generic and boring
You're not being specific enough. Add mood, lighting, and style details. "A tree" is boring. "Ancient oak tree in fog, moody atmosphere, muted blue tones, ethereal" is not.
Problem: The AI ignores part of my prompt
Too many details. Pare it down to 20~30 words max. AI models have limited attention prioritize what matters most.
Problem: Text in images is garbled nonsense
This is a known limitation. AI can't generate readable text reliably. Generate the image without text, then add text using Canva's text tool.
Problem: Faces look weird or creepy
Avoid close up faces unless you're on Dream Lab. For people's images, try medium or full body shots. The AI handles those better. Also, "photorealistic portrait" often works better than just "portrait."
Problem: Colors are wrong
Be specific about your palette. "Blue" could mean navy, sky blue, teal, cyan. Say "navy blue" or "pale sky blue." Even better: "color palette of dusty rose, sage green, and cream."
Usage Limits and What They Mean in Practice
Free Plan Reality Check
You get 50 lifetime uses for Magic Media's text to image. That sounds like a lot until you realize you'll burn 5 10 credits perfecting one good image through iteration.
My advice: treat free credits as your learning phase. Experiment, figure out what prompts work for your needs, then decide if you need a Pro.
Video generation is limited to 5 lifetime attempts for free. Don't waste these the video feature is still rough.
Canva Pro ($120/year or $13/month)
500 image generation credits per month. This is plenty for most creators. I'm a heavy user and rarely hit the limit.
These reset on the last day of each month at midnight UTC. Failed generations (error messages, inappropriate content blocks) don't count against your limit, which is fair.
What Pro gets you beyond more credits:
- Magic Edit (change parts of images with text prompts)
- Background Remover (essential for product images)
- Magic Eraser (remove unwanted objects)
- Higher priority generation (Pro users jump the queue when servers are busy)
Is Pro Worth It?
If you're generating images weekly, yes. The break even is around 5~6 hours saved per month versus manual design work or stock photo searching.
If you're generating once a month for personal projects, probably not yet. Use free until you hit limits.
For businesses and content creators, it's a no brainer. The time savings on social media graphics alone justify the cost.
Real Use Cases with Actual Prompts
I'm going to give you the exact prompts I've used for real projects, with notes on what worked.
Social Media Content
Instagram Post (Square, 1:1)
Used for: Wellness account promoting meditation
Prompt: "Peaceful meditation space with yoga mat and cushions, warm morning light through sheer curtains, plants in corner, minimalist aesthetic, soft focus"
Style: Photo Settings: 1:1 ratio
Worked because: Specific enough to avoid generic stock photo look, but simple enough that AI didn't get confused.
LinkedIn Graphic (Landscape, 16:9)
Used for: Business article about remote work
Prompt: "Modern home office setup, wide angle view, desk with dual monitors and notebook, natural light from large window, professional and clean, architectural photography style"
Style: Filmic Settings: 16:9 ratio
Note: I tried this in "Photo" first but it looked too casual. Filmic added the professional polish needed for LinkedIn.
Instagram Story (Portrait, 9:16)
Used for: Coffee shop promotion
Prompt: "Overhead view of latte with latte art on wooden table, pastries beside it, someone's hands holding phone, warm cozy lighting, lifestyle photography"
Style: Photo Settings: 9:16 ratio
Pro tip: "Overhead view" and "someone's hands" work better than trying to describe full people in portrait orientation.
Marketing Materials
Email Header (Landscape, 16:9)
Used for: Tech company newsletter
Prompt: "Abstract technology background with connected dots and lines forming network pattern, dark blue gradient, modern and professional, subtle glow effects"
Style: 3D Render Settings: 16:9 ratio
Worked because: Abstract backgrounds are where AI shines. No realistic details to mess up.
Product Background
Used for: E commerce product photos
Prompt: "Soft gradient background blending from light pink to peach to cream, smooth and professional, studio backdrop style, minimalist"
Style: Photo Settings: Square 1:1, then cropped as needed
This replaced paying for studio backdrop paper. Generated 10 different color variations in the same product shoot style.
Presentation Graphics
Section Divider Slide
Used for: Marketing presentation
Prompt: "Geometric low poly mountain landscape at dawn, gradient sky from dark purple to orange, minimalist style, professional and modern"
Style: 3D Render Settings: 16:9 ratio
Note: Works as a full slide background. Tested this in both Illustration and 3D Render 3D looked cleaner.
Concept Visualization
Used for: Explaining business growth
Prompt: "Upward trending arrow made of stacked building blocks, clean 3D style, professional blue and white color scheme, floating on neutral background"
Style: 3D Render Settings: 16:9 ratio
This beat trying to design the concept in Canva from scratch. Generated in 30 seconds, dropped into slide, done.
Educational Content
Blog Post Header
Used for: Gardening tips article
Prompt: "Hands planting small seedling in soil, close up shot, bright natural sunlight, dirt on hands, fresh green plant, nurturing and growth theme, lifestyle photography"
Style: Photo Settings: 16:9 ratio
The "hands" element makes it feel more authentic than a plain plant shot.
Thumbnail for Tutorial Video
Used for: Design tutorial YouTube video
Prompt: "Graphic designer workspace from above, tablet with stylus, color swatches, coffee cup, clean and organized, bright natural light, creative and professional atmosphere"
Style: Filmic Settings: 16:9 ratio
Faces work terribly in AI, so workspace shots are my go to for tutorial thumbnails.
Legal and Copyright Stuff You Need to Know
I'm not a lawyer, but here's what Canva actually tells you and what I've learned talking to other creators using these tools.
What You Technically Own
According to Canva's terms: Between you and Canva, you own the images. BUT and this is important, that doesn't mean they're copyrightable in the legal sense.
Most jurisdictions (US included) don't grant copyright protection to AI generated works right now. This means:
You CAN:
- Use the images commercially (in marketing, products, client work)
- Sell products that include AI generated images
- Include them in paid content
- Use them for business purposes
You CANNOT:
- Stop others from using similar images (no exclusive ownership)
- Register them for copyright protection in most cases
- Sue for copyright infringement if someone copies them
Reality check: If you generate an image of "sunset over mountains," someone else might generate something nearly identical. That's fine. Make it part of your larger design, add text, combine with other elements. The complete design is yours even if the AI image isn't copyrightable.
Commercial Use Guidelines
I use AI generated images for client work regularly. Here's my approach:
For social media and web: No concerns. Generate, use, post.
For products you sell (t shirts, prints, mugs): Use them, but don't sell the AI image by itself as "art." Incorporate it into a larger design.
For brand identities: Be cautious. Don't use AI generated images as your core logo or brand mark. Use for supporting graphics only.
For licensed work: If you're licensing images to others, disclose they're AI generated. Some clients want to know.
The Disclosure Question
Should you tell people your images are AI generated?
My take: For transparency and trust, yes but it doesn't need to be a disclaimer on every post. If someone asks, be honest. If you're building a personal brand, mention it once in your about page or process doc.
Don't pass off AI images as photography you took or illustrations you drew. That's just dishonest and will bite you eventually.
Staying Legal
Don't generate:
- Images of real people you don't have rights to
- Branded products or characters
- Anything that mimics a specific artist's signature style too closely
Do generate:
- Generic scenes and concepts
- Abstract and conceptual imagery
- Supporting graphics for your content
- Background and texture elements
When in doubt, make the AI image part of a larger creative work. That's always safer ground.
Canva AI vs the Alternatives
I've used DALL·E 3, Midjourney, and Adobe Firefly alongside Canva's tools. Here's when each makes sense.
Canva AI vs DALL·E 3
Canva's advantages:
- Already in your design tool (no export/import needed)
- Faster generation times
- Style presets make it beginner friendly
- Reference images in Dream Lab
- Free tier exists
DALL·E 3's advantages (via ChatGPT Plus or API):
- Better at understanding complex prompts
- Higher image quality in photorealistic mode
- Better composition and artistic choices
- More consistent with faces and people
When I use each:
- Canva: 90% of the time, especially for work that stays in Canva
- DALL·E 3: When I need a single hero image and quality matters more than speed
Canva AI vs Midjourney
Canva's advantages:
- Way simpler interface (no Discord)
- Faster to get started
- Direct design integration
- Better for non artistic creators
Midjourney's advantages:
- Superior artistic quality
- Better style interpretation
- More control with advanced parameters
- Stronger for creative and artistic work
When I use each:
- Canva: Functional images for real projects
- Midjourney: When I want art, not just imagery
The Practical Take
For most people reading this guide, Canva AI is the right choice. It's not the absolute best at any one thing, but it's good enough at everything and it's already integrated into your workflow.
Use standalone tools when:
- You need one perfect image and have time to generate 50 variations
- You're doing artistic work where quality is paramount
- You're comfortable with more complex interfaces
Stick with Canva when:
- You're creating practical marketing or social content
- Speed matters more than perfection
- You want to generate and design in one tool
Questions People Actually Ask
How many images can I generate for free?
50 lifetime uses for Magic Media text to image on the free plan. Some features like Dream Lab have different limits. Pro gets you 500 per month.
Do I need design experience?
No. If you can describe what you want, you can generate it. I've watched complete beginners create usable graphics in their first session.
Can I edit the generated images?
Yes. Every generated image can be edited with Canva's tools. Pro users get AI powered editing (Magic Edit, Background Remover).
What if I hit my monthly limit?
You wait until it resets (last day of month, midnight UTC) or upgrade to Pro for more credits. Failed generations don't count.
Are these images unique?
Technically yes, but similar prompts create similar images. Add specific details to make yours more distinctive.
Can I use these for print?
Yes. Quality varies, so generate a test print before committing to large runs. The images work fine for most print applications.
Can I sell products with AI generated images?
Yes. T shirts, mugs, prints all fine. Just don't sell the raw AI image as standalone "art" without adding value.
What if the image isn't quite right?
Regenerate with an adjusted prompt, or use Canva's editing tools to fix it. I rarely use generated images completely unedited.
Why does text in images look broken?
AI can't generate readable text reliably yet. Generate without text, then add text using Canva's text tool.
Can I generate images of real people?
No. Canva blocks prompts with real people's names. You can generate "generic person" but not specific celebrities or public figures.
What I've Learned After 500+ Generations
Three months and hundreds of generated images later, here's what actually matters:
Specificity beats length. A focused 20 word prompt with concrete details outperforms a 50 word prompt full of vague descriptors. "Cozy coffee shop with plants and natural light" beats "beautiful welcoming coffee shop environment with a nice atmosphere."
Iteration is faster than perfection. Don't spend 10 minutes crafting the perfect prompt. Spend 2 minutes on a good one, generate, then refine based on what you get. Four rounds of adjustment beats one attempt at perfection.
Style choice matters as much as the prompt. The same exact words in Filmic vs Illustration vs Photo produce completely different images. When something isn't working, try a different style before rewriting your prompt.
AI has blind spots. Faces are inconsistent. Text is broken. Complex scenes with multiple subjects get muddled. Know the limitations and work around them.
The tool is a starting point, not the finish line. I edit almost every generated image crop it, adjust colors, remove backgrounds, add text. The AI creates the base, then I make it fit my project.
The real power isn't in generating perfect images. It's in generating decent images fast, then using Canva's tools to make them work. That's the workflow that's actually saved me time.
Where This All Fits
Canva's AI image generator won't replace photographers or illustrators. It won't create gallery worthy art or magazine quality photography. That's not what it's for.
What it does do: eliminate the friction between "I need an image of X" and actually having that image in your design. For content creators, marketers, small business owners, and anyone who needs visuals regularly, that's valuable.
The best way to use these tools? Start small. Generate a few images for a real project. See what works, what doesn't, and what prompts produce results you can actually use. Then iterate from there.
Your first attempts will probably look AI generated and generic. That's fine mine did too. The difference between mediocre results and good ones isn't some secret trick. It's just practice and understanding what the tools can and can't do.
Try it yourself. Pick a project that needs an image, spend 15 minutes experimenting with prompts, and see what happens. Worst case, you waste 15 minutes. Best case, you figure out a workflow that cuts hours off your design process.